Before the serious work begins, there are a few things you should do (or think about at least).
Getting ready for test builds (UDIDs)
If you or your team are planning on doing any testing of the app (or allowing any sponsor/partner/colleagues the same privilege) then before you go any further with the project there is one thing you should do right now:
Find out the UDID number (‘unique device identifier’, a bit like a unique serial number) for every iPhone/iPad/iPod Touch you wish to test the app on.
Why does this matter? Well, you won’t be able to download your app from the App Store until it is approved (a bit late if you were planning on testing it first!). So in order for you to test it beforehand, your developer will need to include every UDID you give them in each test version of the app that they send. This will then allow you to install it onto your iPhone/iPad through iTunes (instructions on this follow later).
Once you have the UDIDs, I recommend creating an UDIDs List spreadsheet (which you then share with your developer) of all the numbers that are required to test with and the name of the person and the type of device (it is not uncommon for people to write down the number incorrectly and it is much easier to go back and figure out which UDID belongs to which device later on if you have done this). In the Resources section at the back of this guide there is a simple template which you can copy or alternatively download (in .xls format) from the Members Area (under Resources) of app-outsourcing-guide.com
How to get your UDID
- Open iTunes on your computer;
- Plug your iPhone/iPod/iPad into the USB port of your computer;
- Under Devices on the left menu in iTunes click on the device, eg ‘AOG’s iPhone’;
- On the following page, click Serial Number, which will now change to the UDID number (usually 40 characters long);
- Copy down this number carefully (it is not possible to copy and paste it unfortunately) as a mistake here means you won’t be able to test the app on this device when the developer sends the first test build through.
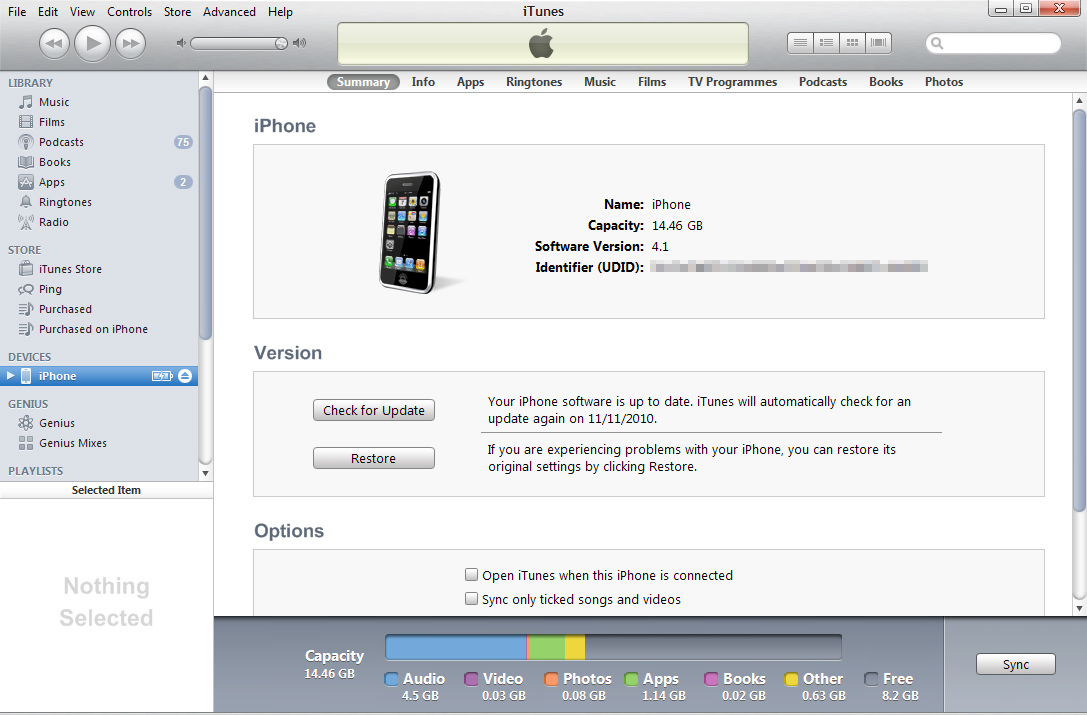 You can find your UDID using iTunes on your computer
Spec and design handover
If you haven’t already, you will need to make sure the design of your app is completed and signed-off by all relevant parties. All the designs should then be handed over to your main supplier / app developer (if they are not designing it for you). You should also handover or share all the specification documents that you produced earlier in the guide, if you haven’t already done so.
If you are passing on a design to the app developers that was produced in-house or by another supplier, then make sure that your developers understand every part of the design and how it should work. If there are any doubts it is much easier to clear these up now.
To ensure there is no confusion, these designs should cover every major type of page on your app (showing ‘dummy content’ if necessary) so the developer knows how things should appear on screen. Whatever is shown in the design should ‘sync up’ perfectly with what you have specified in your Functionality List document.
The designs should also show what happens on each page where there is an opportunity for the user to interact with something (eg. push a button to bring up a menu) and how it should look when that action occurs (eg. how the menu looks when activated and whereabouts on the page it should appear).
Where possible you may want to (or have to) use standard Apple features and design elements (discussed in Part One and in the Apple Human Interface Guidelines for iPhone and iPad). If that’s the case you should also make sure your supplier knows which parts of the app are influenced by this, if the designs don’t speak for themselves.
File names and versioning
Not to be obsessive about this, but to avoid confusion I would (and encourage all others involved in the project to) name files in line with your app’s structure and/or specification documents. You could also establish a standard naming convention to make things really clear.
For example, you can use a ‘-’ in the file name to signify that a certain design is showing how a particular function will work on the page. article-share.jpg, for example, would show the app developer what happens when someone presses the ‘Share’ button on a standard article page.
A ‘_’ in the file name could show levels in the structure of your app. For examples the Columnists page of an app, found in the app under News > Opinion, might be labelled news_opinion_columnists.jpg.
Some more examples:
- loadscreen.jpg – for the page that appears while the app loads
- home.jpg – the default view of the homescreen of the app when first opened
- article.jpg – for an article page on your app
- article-save-open.jpg to show an article page where a user has pressed the save button
- article-save-confirm.jpg to show an article page where a user has confirmed they want to save a story
- article_sport.jpg – to signify that an article in the sport section has different properties or a distinct look to article pages elsewhere in the app (otherwise, if it behaves the same as a regular article, there is no real need to provide an extra design here)
- (If you are creating apps for both iPhone and iPad either create two separate folders for each set of files or add iphone or ipad at the front of your filenames, eg. iphone_article.jpg / ipad_article.jpg etc.
It is up to you how much detail you show here and it is not necessary to demonstrate every possible combination of every button being pressed on every page. There should be enough design files though to show all the differences in design and functionality across the app.
If these files are being created by your team and you need to send them to your developer you could of course just email them all across. If you are hitting some file size limits on your email though, try zipping them or sending them through a service such as yousendit.com
Personally I prefer using a shared folder of some kind. The best service I have found for this is dropbox.com which lets you create a shared folder on your computer which you can then share with anyone else you wish to (either through a similar folder on their own computer or via a web page they can login and access the files from). Not only does this remove the need to constantly send large attachments back and forth it also means that when a change is made to one of the files it automatically updates all versions. This means you will never be scratching around for the email with the ‘right’ version of the homescreen design after it has been through six revisions (a ‘pleasure’ most people will be happy to miss). Dropbox is also free for up to 2GB of storage space which is more than enough for most projects.
Custom Buttons and Icons
If you haven’t already you will need to get some icons designed for your app. I’m talking in particular about the ones that will appear next to your app’s name on the App Store and on people’s iPhone/iPad screens after they download it.
These might seem like relatively small details, particularly at this stage, but they’re not. Why?
#1 You cannot submit your app to Apple without these icons. You don’t want to be about to submit to Apple on a tight deadline and then realise you don’t have them.
#2 The icon for your app that will sit on someone’s iPhone/iPad after downloading it is one of the few things you have to attract the users attention among the maybe 100+ other apps they might have downloaded (only a few of which they are likely to use on a daily basis). We’re not talking subliminal advertising here but you should take every opportunity to help yourself by having a bright, attractive icon that neatly sums up what your app is/does. This is where a great designer is important to make the most of every pixel and give your app every chance of being used on a regular basis after it is downloaded.
#3 Most importantly, the icon you create is one of the few ways you have to drawa attention to your app when people are browsing the listing pages of the App Store (listing pages are the ones that appear when a user either browses a particular category or search result, and sees the name, icon and other basic details of the appropriate apps). If this was real estate space, the value of the icon on these listings page would be sky-high! If a user is going to download your app you need them to be interested enough on this listing page to want to find out more (and move on to the page with the all-important download/purchase button) or you’re going to have a tough time getting a lot of downloads.
A few other points to consider and ways to get ideas:
- If you are not a designer leave it to the experts. Ideally whoever did the amazing design for your app can also create some stunning icons for you too. If you want a different option though, don’t be afraid to get one. It needn’t break the bank (speak to great designers that you know or use Elance to find one) but make sure your app icon rocks!
- Do not try to cram in loads of detail, you are dealing with a small space, accept that. Compare some ‘cluttered’ icons with some simple ones on the App Store. See how almost without exception the simple ones stand out more and just look more inviting. Take the same approach when brainstorming ideas for your icon. (For the same reason avoid using text in your icon unless it is essential).
- Do not embed the price of your app in the icon itself. Not only does this annoy Apple, it looks bad and also means that (should you manage to get accepted with this icon in the first place: unlikely) then the price on your icon may end up being out of sync with the price you charge for the app within the store (the price of the app is set separately and can be changed at any time).
- If you are creating separate iPhone and iPad apps consider using small differences on each icon to distinguish between them.
- Do some dummy searches in the App Store that you know are going to bring up a few results. Browse the search results pages and see which icons stand out to you. Look at apps you have already downloaded, particularly when you were just browsing the App Store on a whim or out of boredom. Are there some ideas you can take from these? Or why not see if you can get some ideas from appstoreicons.com?
- As ever look at those that have done it well. Yes including the obvious ones like ‘Angry Birds’, but also specialists in a particular field that may not have made it into the Top 50 apps but who are doing well in their own niche. Soak it all up. See what your rivals have done, can you do better?
If you’re not sure what dimensions/conventions to follow on these then the best thing to do is take a look at:
‘Creating Custom Icons & Images’ (from Apple’s iPhone Human Interface Guidelines)
developer.apple.com/library/ios/#documentation
